
I know, its pretty dated. I started out by removing the remaining three wheels off the chair legs so that it would be level to sit on. The next thing that had to go was the hideous striped fabric.

The main reason I took the chair was because it had clean lines. With that, it will always remain timeless.

I reupholstered it with this floral print. I love the fabric and still do. The colors have gone in every room I needed it to be in and despite the numerous room color changes, this chair remains to blend well.

After ten years, it remained clean and impeccable of any stains until A. started walking. I don't know what he poured on it, but it has stained my chair. It smells like maple syrup which is yummy, but that yumminess doesn't look so pretty.
I asked my hubby if he wanted to replace the chair with something new, but he said it was too comfy of a chair to get rid of so I should work my magic. It's been like this for a year now and I finally got a chance to reupholster it again this weekend.

I asked my hubby if he wanted to replace the chair with something new, but he said it was too comfy of a chair to get rid of so I should work my magic. It's been like this for a year now and I finally got a chance to reupholster it again this weekend.

To reupholster furniture like chairs and sofas, you can either take it apart and reupholster the chair pieces or make a slipcover for it. It would be ideal to be able to take the chair apart if that were possible. However, I didn't want to destroy the integrity of the chair so to reupholster this chair, I am basically making a permanent slip cover. This can be tricky, but with a little patience, you can do it. I have made dozens of slip covers in my day and I still manage to learn something new every time I make one.
Start out by wrapping your fabric around the chair. Cut your pieces out accordingly. To keep them in place, I pinned them right onto the chair.
Start out by wrapping your fabric around the chair. Cut your pieces out accordingly. To keep them in place, I pinned them right onto the chair.

Pin the pieces together, making sure it is taut and there is no puckering.

Continue to lay the fabric and pin until the entire chair is done. Next, hand baste the pieces together. What I have learned in the past is that sewing this piece together on the machine going off of pins and needles can be cumbersome and take twice as long.

Spend the extra 30 minutes hand sewing the pieces and removing the needles so that when you get to the machine, it is basically connecting the dots. Sewing it will be easy peesy, not having to worry about which direction to sew because some pins have fallen off. If the chair tapers at the bottom, do not sew all the way down because it will be impossible to remove the cover to sew.

I have left the bottom half (part that starts tapering) unsewn, while sewing the rest. Afterward, slowly remove the cover, making sure you don't bust any seams.

Sew the pieces together and slip it back onto the chair.

Now for the details. I decided that I don't want a skirt like the original chair had. Instead, it will just have a clean line at the bottom.
To do this, lay the chair on the side.

Pull the fabric taut, removing any wrinkles or puckering and staple it to the chair.

Start in the center and work your way out. When you reach the legs of the chair, make a cut right next to the leg.

Staple down the fabric to the side of the leg while folding up the fabric that is in front of the leg.

For the opening that you purposely left unsewn, pin and then slip stitch.


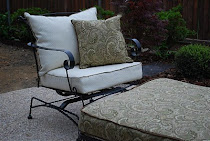
Voila! A new chair for the fabric price of $35.00.


For the piping, I used the reverse of the fabric. It turned out to be the perfect choice. I originally wanted the piping to be more fun with a pop of color, but in the end, I wanted this chair to withstand another ten years. Hence, that is the reason I went with the neutral color in twill fabric. I will use the pops of colors with accent pillows and accessories.


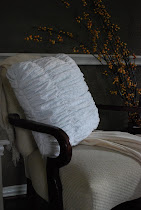
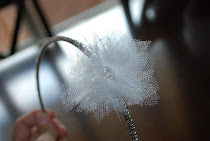
All it needs now is a pretty ruffly decorative pillow and a throw for that perfect reading chair.


.JPG)
.JPG)
.JPG)


.JPG)

.JPG)


.JPG)
.JPG)


.JPG)

Oh wow! It is a brand new chair now! You did an amazing job with this, it looks like something you bought at the store. Fabulous!
ReplyDeleteHow genius to pin straight into the chair so the pieces don't move! And genius again to do a simple basting stitch so you'll know exactly where to machine stitch! You have saved me some time, thanks so much!
ReplyDelete